Hurley Byrd Does it Differently, Very Differently:
We handcraft each and every feeder we sell. Starting with our own designs, producing OUR OWN Lumbers and assembling your feeders with
real screws throughout. We then protect each feeder with a beautiful penetrating oil finish so they last for many years. We take pride in our service, too.
From the moment you first interact with us, whether on our website or on the phone, to the delivery of your feeders and gifts and everything in between.
We want to make owning and gift giving easy for you. So whether it's a simple thank you, a unique deer feeder gift a whole
feeding station for you and your family, choose Hurley-Byrd and see the difference our feeders really make.
All Rights within this website and its related
products are Copyrighted and Reserved by:
Hurley Byrd Wildlife Feeders
462 Williams Crossroads Way
Fairmont, West Virginia 26554
Telephone: 877-363-0199
© 2002 - 2019
Shop by:

Hurley Byrd's Festival of Feeders
Pick Your Exact Feeder Exclusively on eBay

How to Refurbish and Refinish Your Bird Feeders
Our Most Requested Post Purchase Question
Since our products are so beautiful, many customers wish to keep their Hurley-Byrd feeders
looking as nice as possible. In this article, we will touch on two types of feeders. The first is how to refinish
a recently purchased feeder, the other is to refurbish a very old one.
Break out your work clothes and lets get to it.
Why does a feeder age?
To gain a better understanding in how to refinish/refurbish your feeders, we need a quick understanding
to why they age. Any wood item placed outside in the elements obviously ages much faster than
being inside or under a protective roof or even a feeder hanging under an eave of a house.
Many of us think it's the rain or moisture that damages wood and this is good thinking.
Although moisture is part of the cause, it's the sun's harsh ultra violet (UV) rays that do the
majority of the damage. As the sun beats down on a piece of wood, it dries and evaporates the
various natural oils from the wood's surface. As the protective oils leave the wood's surface, pores in the wood's structure open allowing the next component inside, moisture. When it rains or humidity rises
to high levels, moisture fills the pores expanding the wood's cells once more to a point the cells
burst or crack open. The sun comes out and starts the whole process all over again
attacking the wood's cellular structure at an even deeper level.
In time, we find our wood products losing their beautiful and colorful appearance. With more time,
we find the wood's outer layer becomes gray or grayish and will have a cracked or checked appearance.
With a lot of time, this repeated drying and swelling reaches deep inside the lumber and the
whole board begins to crack, typically from the board's ends.
This is the reason Hurley-Byrd applies a high quality penetrating oil finish to each of our
products. A good penetrating oil finish contains UV inhibitors which reflect the sun's harmful rays
away from the wood's cellular construction, adding years of longevity. Even with a finish applied, the
sun will eventually evaporate these materials from the wood's surface and the process noted above begins.
Let's fix this problem so you can enjoy your beautiful feeders for decades.
Lets start with the easy one. The newer feeder.
Although this is the simplest means of renewal, you will have to do it more often, approximately
every twelve months or so. If you wish to have some fun and take this all the way. Follow me.
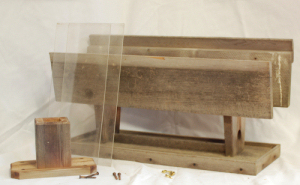
To truly refinish this feeder, it will take a little more elbow grease and more time.
First, remove whatever attachments possible. In this case, we removed the small pole mount from the
feeder's base and refinished it also. There are four screws attaching the roof to the vertical uprights and
we recommend taking the roof off. Carefully remove the screws. They may be brass and a bit soft and
we ask you to use a good screwdriver with good bite to take the screws out.
Once the roof is off, clean and wash everything. Allow it to completely dry before starting the next step.
Once the feeder is dry, scrape any remaining loose material that is fixed to the base.
Now for the elbow grease, sanding. The more you sand and the closer you get to sound wood, the
better the finished product looks. In the case of this feeder, the vertical uprights, underside of the roof and underside of the base still had a great deal of the original finish in good shape. Any area with finish still
intact only needs a light scuffing with sandpaper. We use a 150 grit sandpaper on the whole project
which can be acquired at any good hardware store. A 150 grit paper does a good job without leaving
scratch marks. As best you can, sand the feeder's graying areas down to fresh wood.
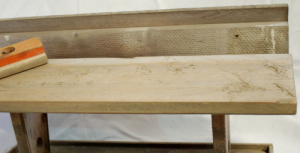
The rails are always worn since the birds talons continually tear away at
them removing the finish quickly. Sand these out very well.
Now comes the more difficult part, sanding the roof. It's a big area and receives the full
effects from the sun all day long. You will find it is probably uniformly gray or it may even be
blackish from airborne pollutants being driven into it from the rains. We recommend you put a lot of
effort in sanding out the roof. Remove as much of the old wood and strive to get down to fresh lumber.
Don't forget to also sand the edges of the boards since they too are well worn from your birds hanging
off the edges. Fresh wood on top of the roof and its edges deeply penetrated with finish here will go
a long way in keeping the boards from prematurely cracking over the upcoming years.
Once you are satisfied with the sanded feeder, it's time to apply the finish. The better the quality of finish,
the longer it will last. We recommend you visit a high quality paint store and ask them for the following:
Fully Transparent Penetrating Oil Finish or Deck Stain.
ONLY use fully transparent finishes. Anything else will leave a topical residue on the feeder
which will flake off and your wildlife will consume the finish. This goes for polyurethanes and the like. Furthermore, as the finish flakes off, it looks horrible. We've all seen old outdoor furniture that
has received 10 coats of paint in its life. Even with a fresh coat of paint, it looks rough and ugly.
Your feeder started its life with a penetrating oil finish, continue to use a fully transparent
penetrating oil finish. Keep in mind, these finishes do come with color tints. A clear finish is
our recommendation but you can buy a tinted finish if you wish to darken the feeder anywhere
from light golds to extremely dark brown. They all look beautiful and it's a personal choice but
remember, refinished wood ALWAYS comes out a LOT darker than the sample in the store.
To apply the finish, follow the manufacture's guidelines, wear protective clothing and POSITIVELY apply
the finish in a well ventilated area. Here at Hurley-Byrd we have a whole room designed specifically for submersing our products into the finish. The room stands alone, is power ventilated and all electrical components in and around the room are explosion proof pieces of equipment. Some finishes are extremely volatile and all are positively harmful to your health. TAKE ALL PRECAUTIONS TO PROTECT YOURSELF, OTHERS, PETS AND YOUR BELONINGS. Follow the manufacture's instructions exactly.
Revisited 14 Months Later - How's it doing?
I was raised on a VERY large Agricultural/Dairy operation in upstate New York and one of the first
lessons my father taught me had something to do with "the proof being in the pudding", as dad said.
His saying was, "Be like an old farmer son, prove it me and I'll believe." Dad was right (don't tell him I said that) and I've adhered to that saying most of my life. Here at Hurley-Byrd we do things one way.
We prove it to ourselves first and then offer it to our customers. We test feeders, we test materials, etc...
a few years, the pores in the wood open due to the natural aging process and when the refinish coat of penetrating oil is applied, it penetrates much deeper than new lumber can possibly allow.
This feeder does not need another coat of finish yet. I expect next year or the year after it will receive
a quick coat of new finish, especially on the roof. At that time it will have its screws tightened, etc... If this feeder is maintained in this fashion, there is no reason it will not last 15 to 20 years and yours will too.
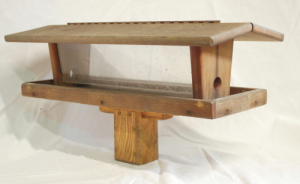
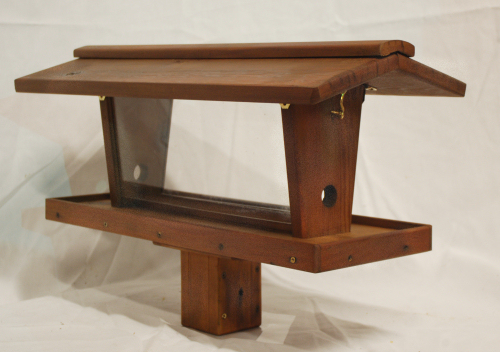
Ultra Large Titmouse Nearly 2 Years Old
The photo to the left is of an Ultra Large Titmouse feeder
with a small pole mount that has been in use continuously
for 22 months and was in a location that received full sun for
the majority of the day. As you can see, it has lost its finish
and is just now starting to get very light in color which means
the wood on this feeder will begin to deteriorate very soon.
Now is a good time to freshen up this feeder. The easiest way
of doing this is to bring the feeder inside, wash, dry and simply
wipe a new coat of penetrating oil finish on the whole feeder.
Once the finish is completely dry, it's time to reassemble the feeder. Before installing the roof, clean the Plexiglas hopper panels. We use windshield washing fluid here but any good window cleaner listed for acrylic sheeting will work perfectly. When you reinstall the roof screws, only run them in until snug. A feeder with a little age on it will have slightly deteriorated screw holes. Although they still have excellent holding power, the holes can be stripped fairly easily. Just run them in snug and you will be good to go.
Once complete, reattach the removed accessories and reinstall in your favorite feeding location.
You have now competed a job well done and have extended the life of your feeder for many years. We have found a refinished feeder accepts the penetrating oil much more deeply that new lumber and you too will find the next refinishing will be several years away.
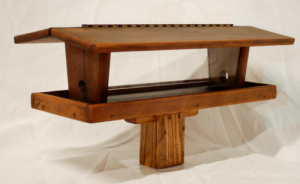
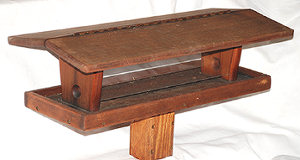
Completely Refinished UL Titmouse
Now for someting a little more challenging. The OLD dried up feeder.
Once the sanding is complete, apply the finish as noted above in the Titmouse refinishing instructions.
(Click here to be taken to these instructions) Apply the finish prior to reassembling the feeder.
It is a lot easier to do so when the feeder is apart and each component will
receive a significantly better protective coat of finish.
When the finish is dry and it's time to reassemble, be careful not to over tighten the screws
during assembly. They only need to be snug. Tightening them too much will strip out the
screw holes and larger screws would need to be installed. If a screw seems a little loose,
stuff a little sawdust in the screw hole and this will help secure it in place.
You have now completely rejuvenated your old, ugly feeder and it is ready for another decade of
enjoying the birds. Do not hesitate to try this project. It's actually a lot of fun and you will be proud
of the accomplishment and so will your wildlife. Not to mention stretching your wildlife feeding dollars.
Better yet, you can expand your feeding station with a new feeder instead of just replacing an old one.
Write us if you have any questions or comments.
Here is the result proving a little effort brings great rewards.
This feeder actually looks better than it did new!
Update - This feeder now graces the owner's office as a sentimental reminder that we
really do produce the best of the best in the world... and getting better all the time!
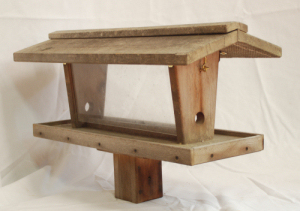
The photos to the left are of Hurley-Byrd's oldest continuously used feeder. It has received more sun
than any other and is in pretty bad shape. It was a
Signature Series feeder crafted in 2000 before Hurley-Byrd was formally established and has serviced us well and
would easily go several more years before
falling apart. Since it has such sentimental value,
we chose to use it as our instructional feeder on
how to refurbish feeders in extremely poor condition.
It is hard to tell but the top photo is a feeder that did not
have penetrating oil finish applied. We started applying
finishes in 2004 and continue to this day. The lumber used in this feeder was a very rare and very pink piece of cedar lumber making a beautiful statement.
The second photo shows this feeder after eight years.
Click here or on the photo to see a much larger and
detailed picture. You will see the ends of the boards are cracked and overall the feeder is in rough condition.
This feeder needs a complete refurbishing so the whole feeder was disassembled, sanded and finish applied.
As with the Titmouse refinished above, we could have just
applied a new coat of finish to the cleaned feeder. If you
do this, two things will happen. First, the resulting color of
the feeder will be extremely dark, near black due to the
old dead wood. Secondly, deteriorated surfaces of the
wood will immediately begin to flake and fall off with a
resulting feeder that looks horrible. To actually rejuvenate
this feeder with hopes of keeping it another decade,
it needed to have all the gray wood removed.
Begin by disassembling the feeder. You won't be able to do this with a manufactured feeder due to their use of staples but since Hurley-Byrd feeders are assembled with solid screws, they can be taken apart and reassemble later.
The photo to the left shows the feeder only partially disassembled. The mount was removed and the Plexiglas taken out. This feeder actually was completely taken apart shortly after these photo were taken. Each and every component was removed so it could be sanded completely. As you take the feeder apart, mark each component in a hidden area that will help guide you in putting it back together exactly as it was before. Otherwise, some items
will not line up properly or at all.
The reason for complete disassembly is because the outer layers of the deteriorated lumber is rather thick. The more of the old dead wood you can remove and closer to fresh the better. Doing so assembled is nearly impossible and
the old soft wood needs to be removed.
In this photo, you can see how much sanding dust was created with only a little work. This is what determined the need to disassemble this feeder. There was way too much dead wood and it had to come off it we wanted to keep
using this feeder for another ten years.
Once apart, sand all components to fresh wood. This
takes a lot of effort but is well worth it in the end. We are
blessed to have many types of woodworking machines
at our disposal and this made the job of sanding the
components much easier. But someone with a
sanding block and good sandpaper will
also achieve the same great results.
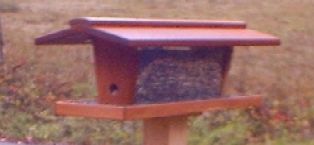
Old Signature Series Feeders
So, here's the "proof in the pudding" that spending a
little time will gain great results when refinishing a feeder. The photo shown to the left is the exact same
feeder above refinished 14 months earlier. It has spent the entire time in the blazing sun at one of the most active feeding locations of my own home.
Earlier today I plucked this feeder off its pole, brought it to work, set it down and took this photo. It has not been touch in any way, not even washed. As you can see the finish is holding up well. Why? As wood ages
.